Automating Secure Connections with SSH Tunnels
Introduction
SSH tunnels offer a robust solution for protecting data and accessing remote
services securely. From accessing remote databases to ensuring secure
development workflows, SSH tunnels play a pivotal role in modern network
management. This article will delve into practical use cases for SSH tunnels
and explore how to automate these long-running connections using tools like
autossh.
One common use case for SSH tunnels is securing access to remote databases. By tunneling your database connection through SSH, you can ensure that sensitive data remains protected from unauthorized access. Another vital application is securing insecure protocols. When you need to use a protocol like FTP, tunneling the connection through SSH provides an added layer of security without altering the protocol itself. Additionally, SSH tunnels are invaluable for remote development and debugging, allowing you to connect your local development environment to remote servers seamlessly.
While SSH tunnels are highly effective, managing long-running connections can
be cumbersome. This is where autossh comes into play. autossh is a simple
yet powerful tool designed to automatically restart SSH sessions if they drop
or experience issues, ensuring continuous and reliable connectivity. In this
article, we’ll explore how to set up and automate these SSH tunnels using
autossh, streamlining your workflow and enhancing your network security.
By the end of this article, you’ll have a clear understanding of how to leverage SSH tunnels for various use cases and the knowledge to automate these connections for consistent and secure remote access.
About Userify: Userify offers a simple and effective way for teams to manage their member’s keys across all of their servers or instances across multiple clouds and private datacenters. Questions? Email our fast and friendly support team and get answers fast, or learn more and try it out in seconds.
Use Cases
SSH local tunnels are incredibly versatile tools that provide secure access to a variety of services. Here are ten practical use cases for local tunnels:
Accessing Remote Databases: By creating a local tunnel, you can securely connect to remote databases without exposing them to the internet. This ensures sensitive data remains protected while allowing you to manage databases from your local machine.
Securing Insecure Protocols: When using protocols that lack inherent security, such as FTP or VNC, tunneling these connections through SSH adds a layer of encryption. This prevents data interception and unauthorized access during transmission.
Remote Development and Debugging: Local tunnels enable developers to securely connect their local development environment to remote servers. This is particularly useful for testing and debugging applications in a production-like environment without deploying changes.
Forwarding Local Ports to Remote Servers: Use SSH to forward local ports to remote servers, allowing access to web services, APIs, or other applications running on remote machines via localhost.
Accessing Intranet Resources: If you need to access internal company resources, such as intranet sites or internal tools, an SSH local tunnel can provide secure access without requiring a VPN connection.
Managing Remote Systems: Administering remote systems often requires accessing various management interfaces and services. SSH tunnels ensure these connections are secure, protecting administrative access from potential threats.
Automating Secure Connections for Scripts: Scripts and automated tasks often need to interact with remote systems. Using SSH tunnels ensures these interactions remain secure, safeguarding sensitive data and credentials used in the scripts.
Accessing Remote File Shares: When working remotely, accessing file shares on a company’s internal network can be challenging. SSH tunnels allow you to mount remote file shares securely, making it easier to work with shared files.
Forwarding Local Web Traffic: Developers often need to test how web applications interact with other services or databases on a remote server. By forwarding local web traffic through an SSH tunnel, you can simulate these interactions securely.
Connecting to Remote Message Queues: Message queues like RabbitMQ or Kafka are often used in distributed systems. By tunneling connections to these remote services, you can securely manage and monitor message queues from your local environment.
These use cases highlight the flexibility and security benefits of SSH local tunnels, making them an essential tool for modern network and application management. In the following sections, we’ll explore how to automate these connections using autossh to ensure continuous and reliable access.
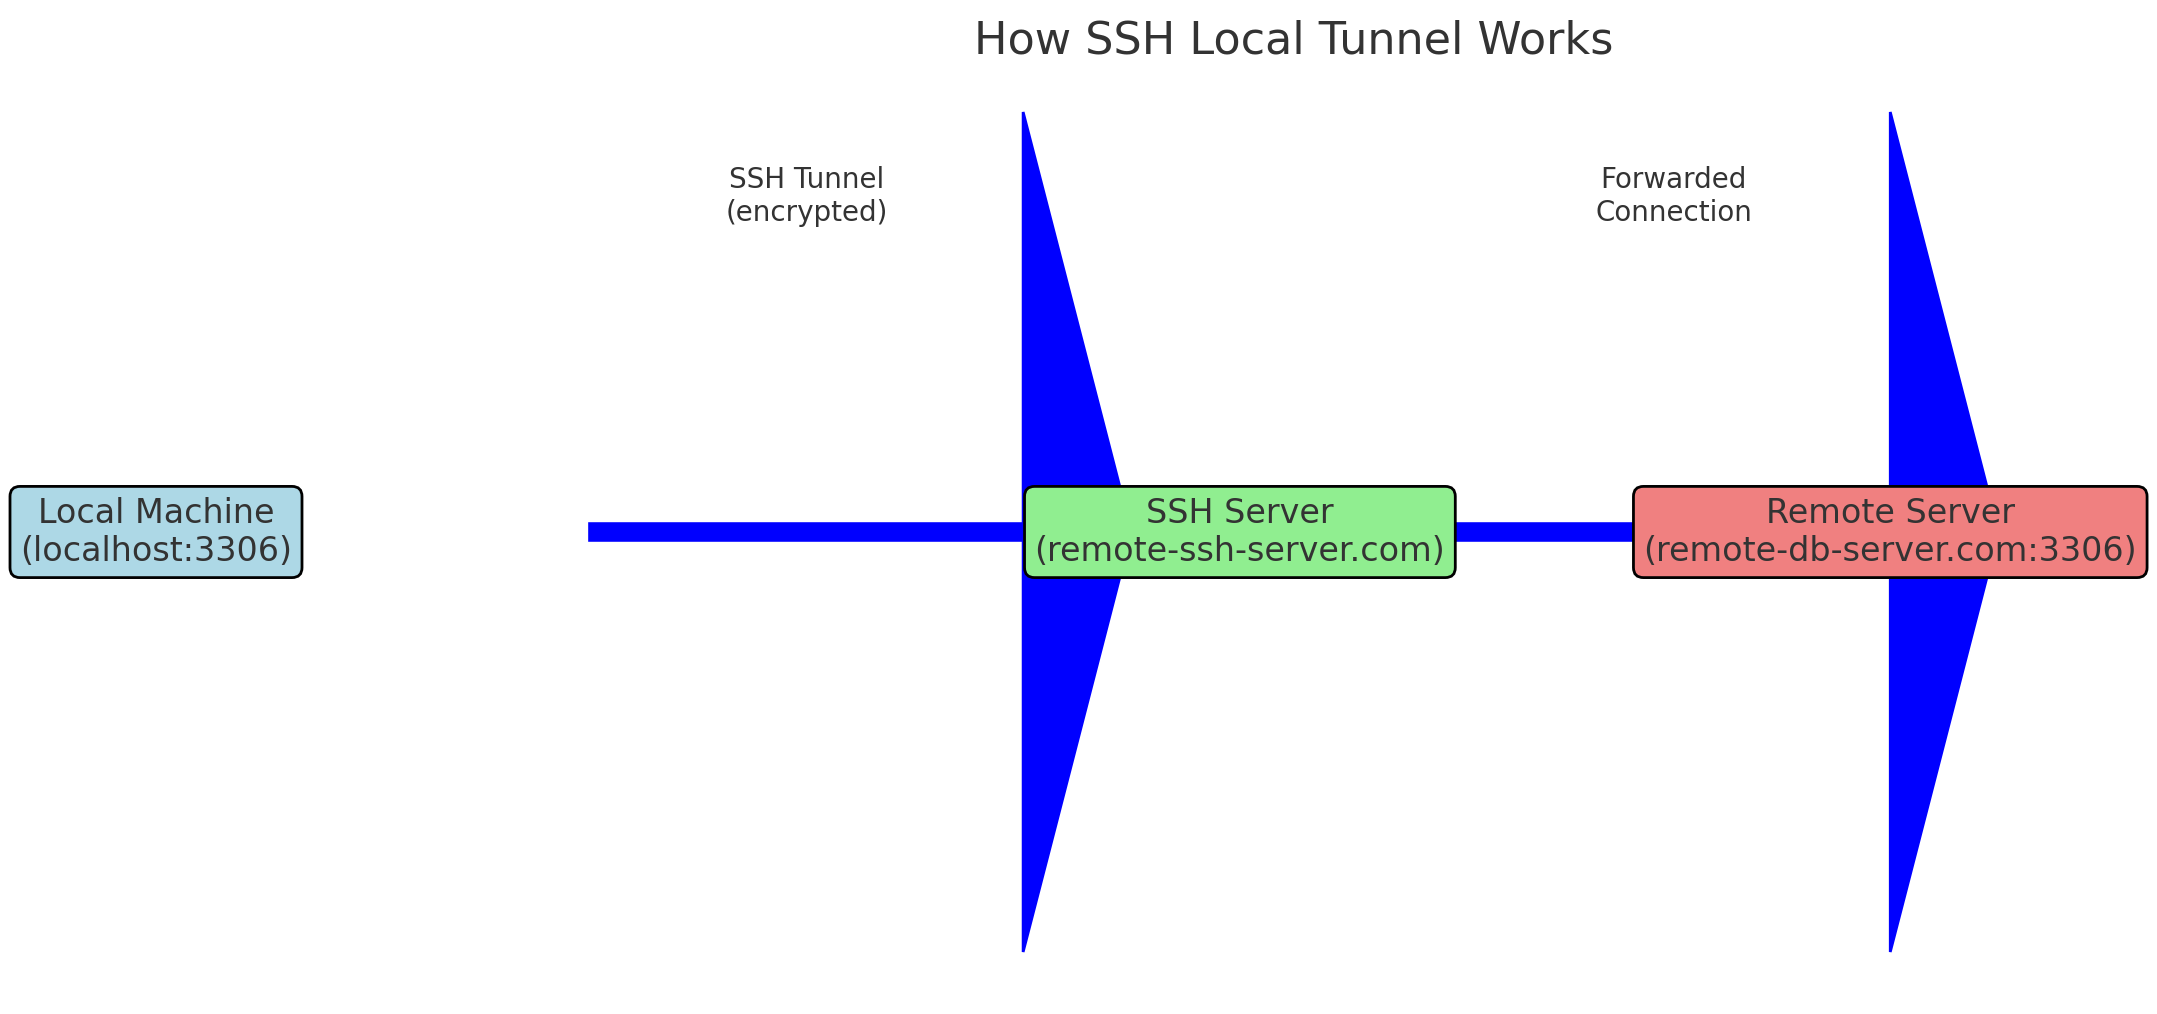
How It Works
SSH local tunnels work by forwarding traffic from a local port on your machine to a remote server, securely transporting the data over an encrypted SSH connection. This setup ensures that data transmitted between the local and remote systems remains confidential and protected from eavesdropping or tampering.
To establish a local tunnel, you need to know several key pieces of information:
Local Port Number: This is the port on your local machine that will be used to access the tunneled service. Choose a port number that is not currently in use on your machine.
Remote Server IP Address or Hostname: This is the address of the remote server where the service you want to access is running. It can be an IP address or a domain name.
Remote Port Number: This is the port on the remote server where the service is running. For example, MySQL typically runs on port 3306, while HTTP services usually run on port 80.
SSH Server IP Address or Hostname: This is the address of the SSH server that will act as the intermediary for your tunnel. In many cases, this might be the same as the remote server, but it can also be a different machine that has access to the target service.
SSH Username: This is the username you use to log into the SSH server.
Local Tunnels
You originate the tunnel from your local machine, so that is called the direction of the tunnel (a “local” tunnel). Tunnels in the opposite direction are called “remote” tunnels, and will be covered in a future article.
A Local Tunnel forwards regular TCP requests from the server you’re logged into to the remote server through the SSH connection. Here’s how the process generally works:
Establish SSH Connection: You initiate an SSH connection from your local machine to the SSH server using your credentials.
Set Up Local Port Forwarding: As part of the SSH connection setup, you specify the local port that will forward traffic to the remote port on the remote server.
Access the Service Locally: Once the tunnel is established, you can access the remote service as if it were running locally on your machine. For example, connecting to localhost:3306 on your local machine would securely tunnel the connection to remote-server: 3306.
Example Setup:
- Local Port: 3306 (for a MySQL database)
- Remote Server: remote-db-server.com
- Remote Port: 3306
- SSH Server: remote-ssh-server.com
- SSH Username: user
SSH CLI Command:
ssh -L 3306:remote-db-server.com:3306 [email protected]
In .ssh/config:
Host remote-db-tunnel
    HostName remote-ssh-server.com
    User user
    LocalForward 3306 remote-db-server.com:3306
By understanding the components and flow of SSH local tunnels, you can set up secure connections to remote services efficiently. In the next sections, we’ll explore automating these tunnels using autossh to maintain long-running connections seamlessly.
Getting Started
To begin using SSH local tunnels, the first step is to identify the port numbers of the services you want to tunnel. Knowing the correct port numbers ensures that your local tunnels are configured accurately, allowing seamless and secure access to remote services. Here’s a brief list of common port numbers for reference:
- MySQL: 3306
- PostgreSQL: 5432
- HTTP: 80
- HTTPS: 443
- FTP: 21
- SSH: 22
- VNC: 5900
- Redis: 6379
- RabbitMQ: 5672
For example, if you need to tunnel a MySQL database connection, you will use port 3306. Similarly, if you need to access a web service, you might use ports 80 (HTTP) or 443 (HTTPS).
Installing autossh
autossh is a helpful tool that automatically restarts SSH sessions if they drop, ensuring continuous and reliable connectivity. Here’s how to install autossh on various distributions:
On Ubuntu/Debian:
sudo apt-get update
sudo apt-get install autossh
On CentOS/RHEL:
sudo yum install epel-release
sudo yum install autossh
On macOS (using Homebrew):
brew install autossh
On Arch Linux:
sudo pacman -S autossh
After installing autossh, you can use it to create persistent SSH tunnels, providing a more robust solution for maintaining long-running connections. In the following sections, we’ll guide you through setting up and automating these tunnels with autossh.
Setting Up autossh to Start on Boot
To ensure that your SSH tunnels are persistent and automatically restart if they drop, you can configure autossh to start on boot. Here’s how to set this up for various distributions and operating systems:
On Ubuntu/Debian
- Create a Systemd Service File:
sudo nano /etc/systemd/system/autossh-tunnel.service
- Add the Following Configuration:
[Unit]
Description=AutoSSH Tunnel Service
After=network.target

[Service]
Environment="AUTOSSH_GATETIME=0"
ExecStart=/usr/bin/autossh -M 0 -N -L 3306:remote-db-server.com:3306 [email protected]
Restart=always
User=your-username

[Install]
WantedBy=multi-user.target
Replace your-username with your actual username and adjust the ports and remote server details as needed.
3. Enable and Start the Service:
sudo systemctl enable autossh-tunnel.service
sudo systemctl start autossh-tunnel.service
On CentOS/RHEL
1. Create a Systemd Service File:
sudo nano /etc/systemd/system/autossh-tunnel.service
2. Add the Following Configuration:
[Unit]
Description=AutoSSH Tunnel Service
After=network.target

[Service]
Environment="AUTOSSH_GATETIME=0"
ExecStart=/usr/bin/autossh -M 0 -N -L 3306:remote-db-server.com:3306 [email protected]
Restart=always
User=your-username

[Install]
WantedBy=multi-user.target
3. Enable and Start the Service:
sudo systemctl enable autossh-tunnel.service
sudo systemctl start autossh-tunnel.service
On macOS
1. Create a LaunchAgent or LaunchDaemon:
sudo nano /Library/LaunchDaemons/com.example.autossh.plist
2. Add the Following Configuration:
<?xml version="1.0" encoding="UTF-8"?>
<!DOCTYPE plist PUBLIC "-//Apple//DTD PLIST 1.0//EN" "http://www.apple.com/DTDs/PropertyList-1.0.dtd">
<plist version="1.0">
<dict>
    <key>Label</key>
    <string>com.example.autossh</string>
    <key>ProgramArguments</key>
    <array>
        <string>/usr/local/bin/autossh</string>
        <string>-M</string>
        <string>0</string>
        <string>-N</string>
        <string>-L</string>
        <string>3306:remote-db-server.com:3306</string>
        <string>[email protected]</string>
    </array>
    <key>RunAtLoad</key>
    <true/>
    <key>KeepAlive</key>
    <true/>
</dict>
</plist>
3. Load the LaunchDaemon:
sudo launchctl load /Library/LaunchDaemons/com.example.autossh.plist
On Arch Linux
1. Create a Systemd Service File:
sudo nano /etc/systemd/system/autossh-tunnel.service
Add the Following Configuration:
[Unit]
Description=AutoSSH Tunnel Service
After=network.target

[Service]
Environment="AUTOSSH_GATETIME=0"
ExecStart=/usr/bin/autossh -M 0 -N -L 3306:remote-db-server.com:3306 [email protected]
Restart=always
User=your-username

[Install]
WantedBy=multi-user.target
2. Enable and Start the Service:
sudo systemctl enable autossh-tunnel.service
sudo systemctl start autossh-tunnel.service
By setting up autossh to start on boot, you ensure that your SSH tunnels are always available, providing a reliable and secure connection to your remote services.
Conclusion
SSH tunnels are indispensable tools for developers and IT professionals, providing secure and reliable access to remote services. By understanding how to set up and utilize SSH local tunnels, you can protect your data and streamline your workflow. From securing database connections to enabling remote development and debugging, the versatility of SSH tunnels is unmatched.
In this article, we’ve covered the fundamentals of setting up SSH local tunnels, identified various practical use cases, and introduced the powerful autossh tool for automating these connections. With autossh, you can ensure your tunnels remain persistent and automatically reconnect, enhancing both security and productivity.
As you integrate SSH tunnels into your daily workflow, remember that this is just the beginning. Future articles will delve deeper into advanced configurations, security best practices, and alternative tools to broaden your understanding and capabilities.
Stay tuned for more insights and tips on leveraging SSH tunnels to their fullest potential. Thanks for reading this article!
Userify offers a simple and effective way for teams to manage their member’s keys across all of their servers or instances across multiple clouds and private datacenters. Questions? Email our fast and friendly support team and get answers fast, or learn more and try it out in seconds.
Questions?
Email our fast, friendly support if you have a question not covered here: [email protected].
Start managing your users and SSH keys in seconds Try for free